
|
| LinkScan Startup Guide for Windows Systems |
| Help Reference HowTo Card |
This document is intended to help new users install and configure LinkScan on Windows systems.
Unix users should see the LinkScan Startup Guide for Unix Systems. Additional information is available in the LinkScan Reference Manual.
This document covers the following topics:
![]()
To successfully install and configure LinkScan on a Windows system you must have:
ActivePerl Build 522 or later, installed on your computer. Perl is free of charge and for download instructions see:
A copy of the LinkScan setup file, linkscan.exe, and a LinkScan License Key. Both are available from:
Perl, the Practical Extraction and Report Language, is a highly portable programming environment developed by Larry Wall. It has become the premier scripting language of the Web. The standard Perl implementation for Windows, ActivePerl is maintained and distributed by ActiveState Tool Corp.
Installation of ActivePerl on a Windows system is a straightforward matter. Although several options are provided during the installation procedure, we recommend that new users accept the automatic defaults.
![]()
Once Perl has been installed, simply execute linkscan.exe, the self-extracting archive, which will start the familiar InstallShield wizard. You may select a target installation folder for LinkScan but we suggest you accept the default: C:\LinkScan10\.
Start LinkScan by double-clicking the LinkScan icon created on your desktop during installation. The first time you execute LinkScan it will automatically start the LinkScan Setup Wizard:
 [Click for larger image]
If you do not yet installed Perl or have not received a License Key, please return to the top of this document for guidance. You may exit LinkScan for now and restart the program later.
Enter your LinkScan License Number and Key.
LinkScan will automatically attempt to locate the Perl executable on your computer; it is typically located at C:\Perl\bin\perl.exe. If LinkScan is unable to find Perl, you must enter the pathname manually. Click the Find button to activate the familiar File Open Dialog Box to browse your computer.
Enter the URL of the website you wish to scan and click Finish.
You should now see the main LinkScan Window:
 [Click for larger image]
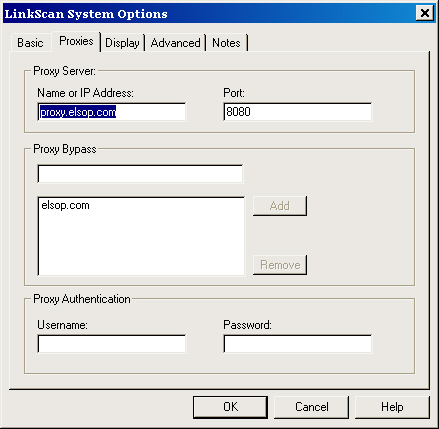
Depending on your network environment, LinkScan may need to know about any Proxy Servers that are required to access computers on the private and/or public networks. On the Main LinkScan Window, click the Options button and select the Proxies tab. Enter the correct name (or IP Address) of your Proxy Server and the Port Number. Note that the correct format for the Proxy Server address is, for example, proxy.example.com or 192.168.10.10. Do not enter a URL address.
 [Click for larger image]
You may optionally specify a list of local hosts/domains for which the Proxy is not to be used. If you are unsure about these settings, please look at your existing browser proxy configuration and/or contact your network administrator.
![]()
LinkScan allows you to create and maintain multiple configurations or Projects. A single Project called default is created during installation. Use the New and Remove buttons to add or delete LinkScan Projects.
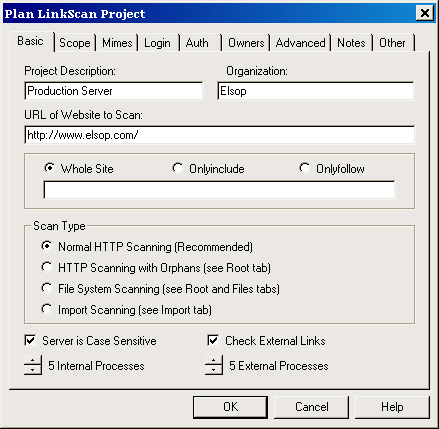
Projects are configured by selecting the Project of interest and clicking the Plan button. The Project Planning dialog box includes many options but initially, we suggest you simply accept the defaults:
 [Click for larger image]
Project Description and Organization: You may enter simple text descriptions for this project and they will be displayed on the associated reports.
URL of website to scan: Enter the URL of the website you wish to scan.
When you enter a URL such as:
http://www.example.com/Products/index.html
LinkScan will automatically enter Products/ in the text box below. You may use the associated Radio Buttons to control the scope of the scan.
Select Full Site (default) to scan the entire site.
Select Onlyfollow if you wish to completely scan the Products/ directory. LinkScan will validate all of the links leading to other directories within the site. However, it will not follow them and scan those other areas of the website.
Select Onlyinclude if you wish to scan the Products/ directory without following, or even checking, those links that lead to other areas of the website.
Scanning Method: We recommend that you use the Normal HTTP Scanning method, at least initially. This method is frequently the most appropriate and is also the simplest to configure.
Many other scanning methods and options are available, but beyond the scope of this Startup Guide. See the LinkScan Reference Manual.
Server Uses Case Sensitive Pathnames: This tells LinkScan whether to treat index.html and INDEX.HTML, for example, as a single file or two different files. In general, this box should be checked when scanning websites hosted on Unix servers and unchecked when scanning websites hosted on Windows servers.
Processes: You may configure the number of processes that LinkScan will use for scanning. These options control the maximum number of simultaneous network requests LinkScan will initiate. Using more processes will cause the scan to complete more rapidly but also uses more CPU, memory and network resources. In general, we recommend you use the default values. Users with large numbers of external links and a fast network connection (i.e. not dial-up) may increase the number of External Processes to accelerate the completion of the scan.
Click OK to save the settings or Cancel to discard them.
![]()
To initiate a complete analysis of your website, select a Project and click the Scan button. A new Scanning tab will be added to the main window and activated so that you may monitor the progress of the scan.
 [Click for larger image]
Please follow these instructions if you see an Invalid License Key error.
On completion of the scan, the Cancel button will change to an OK button and the system will beep. Press the OK button to dismiss the Scanning Dialog box. At this point, LinkScan has generated a comprehensive database containing the results of the analysis.
![]()
From the main LinkScan Window, select an existing Project from the displayed list of Projects and click Exam. This will activate the LinkScan Browser and send it to:
http://127.0.0.1:83/LinkScan/linkscan.cgi
The first time you access the results, you will be presented with the LinkScan Login and Preferences Menu. Simply click Login Now. No username is required unless you later decide to enable various LinkScan security features. You may return to this menu later to modify certain options and preferences but initially we suggest you accept the defaults.
Once you have logged in, you will be presented with the LinkScan Main Menu.
You must select one of the individual Reports and submit the form by pressing Select Report.
A help page is available for each type of LinkScan Report. You may view the appropriate help page at any time by using the Help option on the context-sensitive LinkScan Toolbar. You may also use the [?] links on the LinkScan Main Menu, or the links provided in the summary table below.
The most frequently used reports have been organized in the left hand column; we suggest new users start there. Also, many of the reports incorporate hyperlinks to other reports. This means you can use a drill-down paradigm to view more detail associated with a specific problem or document. For example, some users may never explicitly select a LinkScan/QuickCheck Report. But they will likely view reports of that type by following the [Src] links from other reports.
Summary of Available Reports |
|
| Project Summary Report Summary statistics for the current project |
Summary of All Projects Report Summary statistics for all configured projects |
| Problem Documents Report List documents containing potential problems |
Selected Status Codes Report List errors of specific types |
| Document Detail Report List all/selected documents |
All Pages Linking To ... Report Find pages that link to... |
| Critical Errors Report List most critical errors |
Orphaned Files Report List orphaned files |
| Detailed Errors Report List all/selected errors |
External History Report View history of an external link |
| Changed Documents Report Compare two scans of the current project |
Redirections Report List a summary of redirections |
| Search Documents Report Ad hoc searching: document-centric |
System Configuration Report Display current LinkScan configuration settings |
| Search Links Report Ad hoc searching: link-centric |
LinkScan/QuickCheck View source code and detailed analysis of a document |
| SiteMap Report Display LinkScan SiteMap |
LinkScan/TapMap Display LinkScan TapMap |
The LinkScan Main Menu may include an Owner Selection Box. If enabled, this option will allow you to select a sub-set of the website to which subsequent reports will apply.
In a default configuration, the Owner Selection Box will include entries for each top-level directory scanned, in addition to the special entry "All". This will be the default selection and subsequent reports will apply to the entire website scanned.
Note however, that the LinkScan Administrator may configure and customize the manner in which Owners are created. Hence your installation may appear and behave somewhat differently from that described herein.
In many cases, when you submit the form by pressing Select Report you will be presented with a second menu of options. Initially, we suggest you accept the default options which have been carefully designed to produce excellent results in the vast majority of situations. However, to learn more, you may use the context-sensitive Help button on the LinkScan Toolbar at any time.
Each of the LinkScan Menus and Reports includes a common LinkScan Toolbar. It contains a number of links:
| Main Menu Preferences Advanced | Help Reference HowTo Card |
The Main Menu link will always return you to the LinkScan Main Menu.
The Preferences link will always take you to the LinkScan Login and Preferences Menu.
The Advanced link appears when appropriate and it will cause the current menu to be redrawn with additional options.
The Help link will display an appropriate section of the LinkScan Documentation depending upon the current context.
The Reference link will display the table of contents for the LinkScan Reference Manual.
The HowTo link will display a brief How To Guide with instructions for completing certain Common Tasks.
The Card link will display the LinkScan Quick Reference Card.
![]()
If an attempt to scan a site produces the error: "The LinkScan License Key is Invalid" please follow these steps:
A detailed error message will be displayed in a popup box. Copy the error message to the clipboard by clicking the red icon, and e-mail the error message to key@elsop.com. Our customer service personnel will send you a new License Key, typically in less than an hour.
When you receive the new License Key, from the main LinkScan Window, press the Options button. Paste the new Key into the dialog box. Click OK to save the new Key and then click the Scan button.
If you are experiencing difficulties, please:
See the: LinkScan Frequently Asked Questions (FAQ) or
Send mail to: linkscan@elsop.com
Removing LinkScan is clean and simple; we have taken enormous care to minimize the impact of LinkScan on your System DLL's and Windows Registry.
To completely remove LinkScan from your system, open the Windows Control Panel and use the Add/Remove Programs option. You may wish to manually inspect the LinkScan folder and delete any residual and unwanted files using the Windows Explorer or File Manager.
![]()
LinkScan Startup Guide for Windows Systems
LinkScan Version 11.6
© Copyright 1997-2006
Electronic Software Publishing Corporation (Elsop)
LinkScan™ and Elsop™ are Trademarks of Electronic Software Publishing Corporation
| Help Reference HowTo Card |